How to Install the Steering Damper on the Mantis Pro SEUpdated a month ago
Installing a steering damper on your Mantis Pro SE improves stability at high speeds and helps prevent speed wobble, giving you more precise control and confidence during rides. Follow this step-by-step guide for proper installation.
Purchase & Reference
You can purchase the steering damper kit here:
Steering Damper for Mantis Pro SE
For a video tutorial, see:
Installation Video
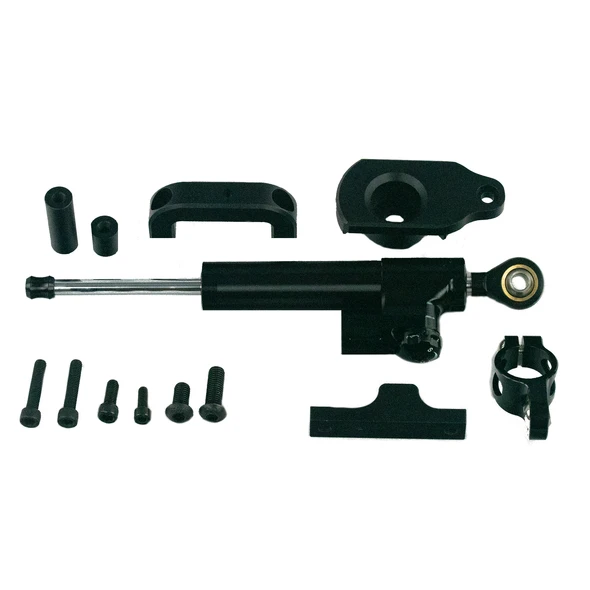
What You Will Need
M6x35 screws (2)
M6x20 screw (1)
M8x20 screw (1)
M8x30 screw (1)
Large and small cylinders
Front and back base plates for the stem
Steering damper
Step-by-Step Installation
Step 1: Front Base Plate
Remove the front fender and screws at the base of the stem.
Align the front base plate with the stem and replace the screw.
Take the M6x20 screw and screw it upwards into the smaller cylinder of the base plate.
Step 2: Back Base Plate
Thread the M6x20 screw through the middle of the back base plate.
Thread the M6x35 screws through both sides of the back base plate.
Step 3: Connecting Front Base Plate
Hold the front base plate against the lower stem.
Insert the longer included screw perpendicular to the stem and attach the longer cylinder.
Step 4: Installing Steering Damper
Use the M8x30 screw to connect the damper to the front base plate.
Use the M8x20 screw to connect to the back base plate.
Connect the brace linking the front and back base plates.
Test ride the scooter to ensure the steering feels stiffened and stable.
Key Notes
The steering damper should be checked periodically to ensure all screws remain tight.
Proper installation significantly improves high-speed control and reduces wobble.